Stub-EASE™ Install Instructions
1. Select fitting and/or coupling depending on depth of concrete slab and reinforcing details
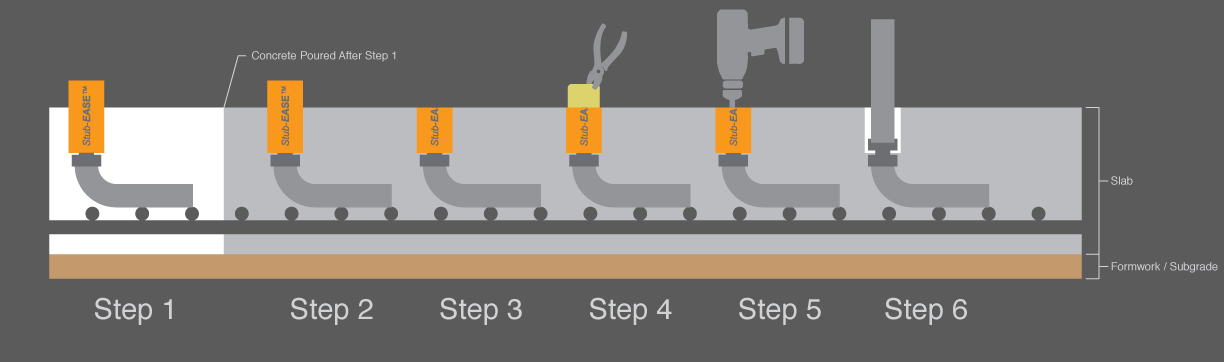
2. Install supported 90° pipe bend with associated female threaded fitting or short radius 90° elbow with Stub-EASE™fully threaded to maintain a seal between connector and Stub-EASE™.
NOTE: A dab of Vaseline or petroleum jelly around the plastic threads of the Stub-EASE™ or the female threads of the connector aides in the extract on process as well as protects the threads from the form of concrete slurry thus making the future installation on of the male fitting much easier as well. Combined system must be maintained below top of concrete although no more then - 3” below top of slab.
3. Maintaining Stub-EASE™during the pour is a necessity. Once the concrete has set up to the point of being able to support the completed finish under foot traffic it is imperative that Stub-EASE™is twisted 1⁄2 turn counter clockwise and then twisted 1⁄2 turn clockwise to break any slurry in the threads or round out the sleeve formed in the concrete. After exercising the threads and form; cut Stub-EASE™ flush with the top of slab as the trip/fall hazard is not eliminated until such time.
4. Pressure fitted foam will provide protection of extraction sleeve/chase from concrete during the pour as well as construction dust/debris once cut flush with top of slab.
5. The tip of the extraction sleeve has been reduced in thickness to allow the same sized spade bit as the part (i.e. 1⁄2” part uses a 1⁄2” spade bit) to puncture the plastic with minimal effort to allow a larger surface area to be in contact with the walls of the sleeve during the extraction process. Once the spade bit is seated in the sleeve/chase the hammer drill function of the drill or preferable impact driver with associated spade bit is used until the remaining sleeve is removed from the concrete leaving a formed chase to the threaded embed.
6. The vertical extension of the raceway is now installed in the framed walls using a male compression fitting attached to the vertical conduit and threaded into place.
Stub-EASE™ Do’s & Do Not’s
Must not be embedded in concrete any further than 3” (where the taper of the wall changes pitch).
Must be finger tightened ONLY with no exposed threads.
Connection between embedded sleeve and connector/ fitting must NOT be taped.
Stub-EASE™ must be supervised during the concrete pour as would any embedded projection.
Stub-EASE™ is NOT considered safe until it is cut flush with the top of the slab.